$show=home

Talend - Job Design

Talend - Job Design Shout4Education
This is the technical implementation/graphical representation of the business model. In this design, one or more components are connected with each other to run a data integration process. Thus, when you drag and drop components in the design pane and connect then with connectors, a job design converts everything to code and creates a complete runnable program which forms the data flow.

Creating a Job

In the repository window, right click the Job Design and click Create Job.
Creating a Job
Provide the name, purpose and description of the job and click Finish.
You can see your job has been created under Job Design.
Now, let us use this job to add components, connect and configure them. Here, we will take an excel file as an input and produce an excel file as an output with same data.

Adding Components to a Job

There are several components in the palette to choose. There is a search option also, in which you can enter the name of the component to select it.
Adding Components to a Job
Since, here we are taking an excel file as an input, we will drag and drop tFileInputExcel component from the palette to the Designer window.
Now if you click anywhere on the designer window, a search box will appear. Find tLogRow and select it to bring it in the designer window.
Finally, select tFileOutputExcel component from the palette and drag drop it in designer window.
Now, the adding of the components is done.

Connecting the Components

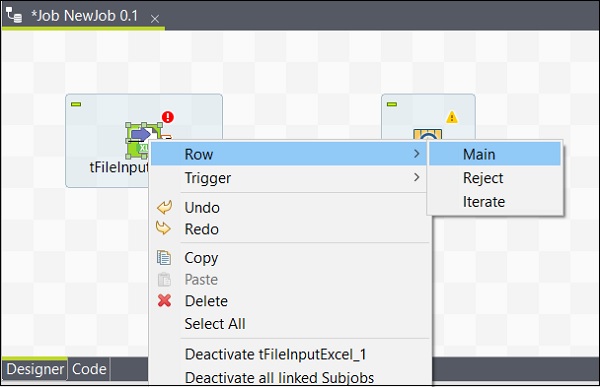
After adding components, you must connect them. Right click the first component tFileInputExcel and draw a Main line to tLogRow as shown below.
Connecting the Components
Similarly, right click tLogRow and draw a Main line on tFileOutputExcel. Now, your components are connected.

Configuring the components

After adding and connecting the components in the job, you need to configure them. For this, double click the first component tFileInputExcel to configure it. Give the path of your input file in File name/stream as shown below.
If your 1st row in the excel is having the column names, put 1 in the Header option.
Configuring the components
Click Edit schema and add the columns and its type according to your input excel file. Click Ok after adding the schema.
Click Yes.
Click Yes.
In tLogRow component, click on sync columns and select the mode in which you want to generate the rows from your input. Here we have selected Basic mode with “,” as field separator.
Finally, in tFileOutputExcel component, give the path of file name where you want to store
your output excel file with the sheet name. Click on sync columns.

Executing the Job

Once you are done with adding, connecting and configuring your components, you are ready to execute your Talend job. Click Run button to begin the execution.
Executing the Job
You will see the output in the basic mode with “,” separator.
Executing the Job
You can also see that your output is saved as an excel at the output path you mentioned.

Comments

Blogger
Name

.NET_Interview,1,Accenture,1,Accenture News,1,Accenture_GFT,1,Accenture_Prep,1,Advance_Excel,22,Advance_Python,10,Advanced_Linux,6,Advanced_SQL,18,Advanced_Unix,6,AI,2,AI-900,1,Alexa,1,Alias,1,Amazon,1,Amazon Lightsail,1,Amazon News,7,AMCAT,1,AMCAT_Prep,1,AMCAT_Solved_Papers,1,Ancient India,5,Android,1,Android Security,1,Ansible,2,Apache,1,Apache_Sqoop,10,Aptitude,1,artofthepot,1,artofthepot RO,1,Asterisk,1,AWS,40,AWS CLI,7,AWS DeepRacer,1,AWS Developer,2,AWS Developer Associate,2,AWS EC2,2,AWS Lambda,1,AWS Lifecycle Management,1,AWS S3,4,AWS Services,5,AWS Snapshots,1,AWS Solution Architect Associate,1,AWS SysOps Admin,1,AWS Tutorials,14,AWS_Dumps,1,AWS_Interview,1,AZ-104,1,AZ-900,4,Azure,7,Azure Administrator Associate,1,Azure AI Fundamentals,1,B Tech,4,B_Tech,19,B.Tech,5,B.Tech Jobs,1,Backup,3,Banking Exam,1,Banking_Exam,1,Basic_Linux,29,Basic_Python,19,Basic_SQL,24,Basic_Unix,30,BAT,1,Best_Websites,1,bgcsavannah,1,bgcsavannah DE,1,Big_Data_Analytics,70,Blog,731,Blogger,3,Blogging,2,Blogspot,1,Books,2,Boto3,1,BTech,20,C++_Interview,1,CBSE,158,Certification,14,ChatGPT,1,Cheat Sheet,18,Civil_1st_Semester,1,Class 11,54,Class 11 Biology,7,Class 11 Chemistry,12,Class 11 Economics,2,Class 11 English,11,Class 11 Mathematics,14,Class 11 Physics,8,Class 12,74,Class 12 Accountancy,1,Class 12 Biology,16,Class 12 Chemistry,16,Class 12 Economics,5,Class 12 English,14,Class 12 Mathematics,7,Class 12 Physics,15,Class_12,28,Class_12_Chemistry,4,Class_12_Computer_Science,7,Class_12_Mathematics,1,Class_12_NCERT,15,Class_12_NCERT_Solutions,15,Class_12_Physics,18,Class_12_Physics_NCERT_Solutions,15,Class_12_Science,29,Cloud,2,Cloud Storage,2,Cloud_Service,1,CloudFormation,4,Coding,1,Cognizant News,1,Communication,2,Computer,18,Computer_Memory,2,Computer_Programming,2,Computer_Science,4,Control Panel,1,Control_System,9,Converter,1,Crack_Interview,3,CSE_5th_Semester,1,CSS,1,Darmowe Spiny Bez Depozytu W Kasynie Vulkan Vegas 235,1,Data Analyst Jobs,1,Data Science,2,Data Science Interview,1,Data_Analytics,16,Data_Science,18,Data_Science_Interview,1,Database,47,Database Interview,2,Database_Interview,4,Databases,9,Delta Lake,1,Desktop Environment,1,Deutsche Online Casinos Jetzt Sicher um Echtgeld Spielen 509,1,Development Tools,3,DP-203,1,DP-900,1,Dumps,2,ECE,4,ECE 2nd Semester,4,ECE_1st_Semester,1,ECE_1st_Year,1,ECE_4th_Semester,9,Electrical,2,Electrical Engineering,2,Electrical_1st_Semester,1,Electronic Devices,4,Electronics,2,Electronics & Communication,7,Electronics_&_Communication,14,English,2,Error,1,ESE,4,ESE EC,1,Ethical Hacking,2,Ethical_Hacking,1,ETL_Tools,17,Exam Dumps,6,Exam Preparation,22,Exam_Cracker,3,Exams,5,Exams_Banking,1,Exams_Prep,1,Excel,22,Excel_Macros,22,Excel_Terms,1,Excel_VBA,22,EXE,1,File Permission,1,File System,1,Free_OS,1,Free_Softwares,1,FTP,1,Games,3,GATE,24,GATE EC,3,GATE EE,2,GATE Electronics & Communication,1,GATE Machine,1,GATE Mathematics,1,GATE Measurements,1,GATE_2019,16,GATE_2020,16,GATE_2021,7,GATE_EC,10,GATE_ECE,9,GATE_ECE_Best_Book,1,GATE_Electrical,1,GATE_Electronics,12,GATE_Made_Easy,1,GATE_ME,6,GATE_Mechanical,6,GGSIPU,1,Git,3,Google,2,Google Cloud,2,Google Jobs,1,Google News,3,Google Play,1,Google Search,1,Government Jobs,2,Graphic,1,GRUB,1,Handwritten Notes,6,Handwritten_Notes,10,Hardware,6,HCL_Prep,1,HDFS,1,Hive,1,Hive Tutorials,1,Hosting,2,How To,72,How_To,8,HR Interview,2,HR Interview Questions,1,HR_Interview,3,Hyderabad_News,1,IBPS,2,IBPS_English,1,IBPS_PO,2,Indian History,5,Informatica,1,Informatica_Interview,1,Information,20,Internet,5,Interview,20,Interview Preparation,5,Interview_Prep,20,IPU,1,ISRO Jobs,1,IT Jobs,4,IT News,1,Java,3,Java Interview,1,Java_Interview,2,Java_Questions_&_answers,1,JavaScript,1,JEE,6,JEE_Mains,6,Job Alert,6,Jobs,1,Jocuri Pacanele Gratis Jocuri ca la Aparate 77777 942,1,Jupyter Notebook,1,Kali Linux,1,Kali Linux Tools,1,Katoolin,1,Keyboard,1,Keyboard_Shortcuts,1,Layoffs,3,Learn_VBA,22,Linux,82,Linux Command,20,Linux Interview,1,Linux Mint,1,Linux Tools,11,Linux Tutorials,1,Linux_Distributions,1,Linux_Interview,1,Linux_Redirections,1,Linux_Scripting,30,Linux_Shell_Arrays,1,Linux_Shell_Functions,1,Linux_Shell_Quote,1,Linux_Signals_And_Traps,1,Logical_Reasoning,1,M.Tech Jobs,1,Machine Learning,1,Machine Learning Interview,1,Machine_Learning,1,Machine_Learning_Interview,1,Macros,22,Malware,1,Manufacturing_Processes,1,MariaDB,2,Matplotlib,1,ME_1st_Semester,1,ME_Fluid_Mechanics,1,ME_Industrial_Engineering,1,ME_Machine_Design,1,Mechanical,6,Memory,1,Microcontroller,1,Microsoft,6,Microsoft Azure Associate,1,Microsoft Azure Data Engineering,1,Microsoft Azure Fundamentals,5,Microsoft Edge,1,Microsoft Jobs,1,Microsoft News,1,Microsoft_Azure,1,Microsoft_Azure_Interview,1,Mobile,1,Mobile News,1,MongoDB,1,mostbet,2,mostbet AZ,1,mostbet UZ,1,MS_Access,40,MySQL,58,NCERT Solutions,128,Network,2,News,3,Nginx,2,Notes,31,NumPy,1,OOPs,1,Open_Source_OS,1,OpenTelemetry,1,Operating_Systems,2,Operating_Systems_Interview,1,Oracle,42,Oracle Interview,1,Oracle_Interview,1,OS,1,Pandas,16,Paytm Jobs,1,PEM,2,PHP,2,Physics,2,PIP,1,PL_SQL,42,PL_SQL_Interview,1,Placement,21,Placement Preparation,19,Placement_Prep,24,Poetry,1,PowerShell,1,PPK,2,Programming,29,Programming_Languages,1,PuTTY,3,PySpark,60,PySpark Tutorial,55,Python,67,Python Tutorials,25,Python_Built_In_Strings_Methods,2,Python_built_In_Tuple_Functions,1,Python_CAlling_a_Function,1,Python_CGI,1,Python_Class,1,Python_Data_Types,1,Python_DAte,1,Python_Decision_Making,1,Python_Dictionary,1,Python_DOM_APIs,1,Python_Features,1,Python_Files_Functions,1,Python_For_Loop,1,Python_Functions,6,Python_GUI,1,Python_History,1,Python_If_Else,1,Python_import_Statements,1,Python_Installation,1,Python_Interview,1,Python_JPython,1,Python_Lists,2,Python_Loops,1,Python_Methods,1,Python_Modules,1,Python_MySQL,1,Python_Nested_If_Else,1,Python_Nested_Loops,1,Python_Number_Type_Conversion,1,Python_Numbers,2,Python_Object_Oriented,1,Python_OOP,1,Python_Pass_By_Reference_vs_Value,1,Python_Programming,28,Python_Scripting,28,Python_Special_Operators,1,Python_Strings,2,Python_Strings_Functions,1,Python_Threading_Module,1,Python_Time,1,Python_Tkinter,1,Python_Tuples,2,Python_Tutorial,28,Python_Types_of_Loops,1,Python_Variables,1,Python_Web_Server,1,Python_While_Loop,1,Python_wxPython,1,Python_XML_Processing,1,PythonPath_Setup,1,Quantitative,1,Quantitative_Aptitude,2,RDBMS,1,Recorder,1,Regular Expressions,1,Restore,1,Run,1,S3,1,Sabrent,1,Samsung,1,SAP Jobs,1,SAP News,1,SBI Jobs,1,Scripting,52,Scripting Interview,1,Security,1,Server,2,service now,1,Shell_Command_Manual,1,Shell_Logging_Commands,1,Shell_Scripting,31,Shell_Scripting_Interview,1,Software Engineering Interview,1,Software_Engineering_Interview,1,Solutions,1,Spark,1,Spinnaker,1,SQL,53,SQL Interview,4,SQL Server,3,SQL Tutorials,1,SQL_Alias_Syntax,1,SQL_Alter_Table_Query,1,SQL_Alter_Table_Statement,1,SQL_AND_OR_Query,1,SQL_AND_OR_Statement,1,SQL_Architecture,1,SQL_Clone_Table,1,SQL_Commands,1,SQL_Conjunctive_Operators,1,SQL_Constraints,1,SQL_Create_Database,1,SQL_Create_Table,1,SQL_DataTypes,1,SQL_Date_Functions,1,SQL_Date_Statement,1,SQL_DCL,1,SQL_Server,39,SQL_Temporary_Table_Statement,1,SQLite,43,Sqoop,9,Sqoop_Tutorial,10,SSC,4,SSC CGL,1,SSC CHSL,1,SSC_CGL,3,SSC_CGL_English,1,SSC_CHSL,1,SSC_CPO,1,SSC_GS,1,SSC_Quantative,1,SSD,1,ssl,1,Storage,1,Talend,17,Talend Interview,1,Talend_ETL,15,Talend_Tutorials,16,Task Scheduler,1,TCS Interview,1,TCS Jobs,1,TCS News,1,TCS_Interview,1,TCS_Prep,1,Tech News,22,Tech Tips,72,Teradata_Interview,1,Terraform,4,Təyyarə Oyunu Mostbet Mostbet Aviator game 651,1,Tips & Tricks,12,Tips_&_Tricks,18,Top 10,4,Top 20,1,Top 50,11,Top_10,1,Top_50,18,Top25,1,Tutorials,243,Tutorials_Python,28,Tutorials_VBA,11,Ubuntu,13,Uncategorized,2,Unix,32,Unix Interview,1,Unix Tutorials,1,Unix_Interview,1,Unix_Scripting,31,UPSC,5,VBA,22,VBA_Basics,22,VBA_Excel,22,VBA_Scripting,22,VBA_Tutorials,22,Vim,1,VirtualBox,1,Visual Studio Code,3,Visual_Basic_Application,22,VPN,1,vulkan vegas,1,vulkan vegas DE,1,Web Development,7,Web Server,1,Websites,7,Windows,33,Windows Command,2,WinSCP,1,WordPress,3,Yarn,1,Авиатор Mostbet 155,1,бонусы,1,Казино МостБет УЗ регистрация,1,
ltr
item
Shout4Education - Get Jobs, Tutorials and Notes: Talend - Job Design
Talend - Job Design
Talend - Job Design - Shout4Education ..... This is the technical implementation/graphical representation of the business model. In this design, one or more components are connected with each other to run a data integration process. Thus, when you drag and drop components in the design pane and connect then with connectors, a job design converts everything to code and creates a complete runnable program which forms the data flow. Creating a Job In the repository window, right click the Job Design and click Create Job. Creating a Job Provide the name, purpose and description of the job and click Finish. Provide the name, purpose and description of the job and click Finish. You can see your job has been created under Job Design. You can see your job has been created under Job Design. Now, let us use this job to add components, connect and configure them. Here, we will take an excel file as an input and produce an excel file as an output with same data. Adding Components to a Job There are several components in the palette to choose. There is a search option also, in which you can enter the name of the component to select it. Adding Components to a Job Since, here we are taking an excel file as an input, we will drag and drop tFileInputExcel component from the palette to the Designer window. Since, here we are taking an excel file as an input, we will drag and drop tFileInputExcel component from the palette to the Designer window. Now if you click anywhere on the designer window, a search box will appear. Find tLogRow and select it to bring it in the designer window. Now if you click anywhere on the designer window, a search box will appear. Find tLogRow and select it to bring it in the designer window. Finally, select tFileOutputExcel component from the palette and drag drop it in designer window. Finally, select tFileOutputExcel component from the palette and drag drop it in designer window. Now, the adding of the components is done. Now, the adding of the components is done. Connecting the Components After adding components, you must connect them. Right click the first component tFileInputExcel and draw a Main line to tLogRow as shown below. Connecting the Components Similarly, right click tLogRow and draw a Main line on tFileOutputExcel. Now, your components are connected. Similarly, right click tLogRow and draw a Main line on tFileOutputExcel. Now, your components are connected. Similarly, right click tLogRow and draw a Main line on tFileOutputExcel. Now, your components are connected. Configuring the components After adding and connecting the components in the job, you need to configure them. For this, double click the first component tFileInputExcel to configure it. Give the path of your input file in File name/stream as shown below. If your 1st row in the excel is having the column names, put 1 in the Header option. Configuring the components Click Edit schema and add the columns and its type according to your input excel file. Click Ok after adding the schema. Click Edit schema and add the columns and its type according to your input excel file. Click Ok after adding the schema. Click Yes. Click Yes. In tLogRow component, click on sync columns and select the mode in which you want to generate the rows from your input. Here we have selected Basic mode with “,” as field separator. In tLogRow component, click on sync columns and select the mode in which you want to generate the rows from your input. Here we have selected Basic mode with “,” as field separator. Finally, in tFileOutputExcel component, give the path of file name where you want to store Finally, in tFileOutputExcel component, give the path of file name where you want to store your output excel file with the sheet name. Click on sync columns. Executing the Job Once you are done with adding, connecting and configuring your components, you are ready to execute your Talend job. Click Run button to begin the execution. Executing the Job You will see the output in the basic mode with “,” separator. You will see the output in the basic mode with “,” separator. Executing the Job You can also see that your output is saved as an excel at the output path you mentioned. You can also see that your output is saved as an excel at the output path you mentioned.
https://blogger.googleusercontent.com/img/b/R29vZ2xl/AVvXsEgyUjxW37PbaEAeeGdWl7SmoYzgaoqHszwPP5p7aJUwL-_zQuwZCjBkpRBk8kQgl834mqR38oDkpHOx9y8RzLSZwXCWSB4tFYzS4Ncjn-xT0Ruv8LsIuaKc26sNfDGIQXKzvFCVt_CI4ts/s640/bigstock-data-business-intelligence-war-89863034.jpg
https://blogger.googleusercontent.com/img/b/R29vZ2xl/AVvXsEgyUjxW37PbaEAeeGdWl7SmoYzgaoqHszwPP5p7aJUwL-_zQuwZCjBkpRBk8kQgl834mqR38oDkpHOx9y8RzLSZwXCWSB4tFYzS4Ncjn-xT0Ruv8LsIuaKc26sNfDGIQXKzvFCVt_CI4ts/s72-c/bigstock-data-business-intelligence-war-89863034.jpg
Shout4Education - Get Jobs, Tutorials and Notes
https://shout4education.blogspot.com/2020/02/talend-job-design.html
https://shout4education.blogspot.com/
https://shout4education.blogspot.com/2020/02/talend-job-design.html
true
7947974353386595563
UTF-8
Loaded All Posts Not Found Any Posts :( View All Read More Reply Cancel Reply Delete By Home Pages Posts View All Similar Posts Label Archive Search All Posts Not Found Any Post Match with Your Request Sorry !! Search Something Blazing :) Back Home Sunday Monday Tuesday Wednesday Thursday Friday Saturday Sun Mon Tue Wed Thu Fri Sat January February March April May June July August September October November December Jan Feb Mar Apr May Jun Jul Aug Sep Oct Nov Dec Just Now 1 Minute Ago $$1$$ minutes ago 1 Hour Ago $$1$$ hours ago Yesterday $$1$$ days ago $$1$$ weeks ago More than 5 Weeks Ago Followers Follow :) This Premium Content is LOCKED !!! STEP 1: Share. STEP 2: Click the Link You Shared to Unlock Copy All Code Select All Code All Codes were Copied to Your Clipboard :) Can NOT Copy the Codes / Texts, Please Press [CTRL]+[C] (or CMD+C with Mac) to Copy